Sunday, 28 October 2018

So Thankful PLUS VIDEO for 2Crafty Chipboard

 
I'm here today to share my latest creation for 2Crafty Chipboard.
 I've also created a video tutorial, so read on to see it...
 
This one's titled:
 

'Thankful'


A bright and colourful page, with lots of hand painted roses and 2Crafty Chipboard.
 
This one celebrates a special weekend we had with family from the other side of the world.


I love the bright colours teamed with black and white.
 
I used the following 2Crafty Chipboard:
 
'Thankful Script Title'
'Flowers Fine'
'Sharon's Butterflies'
'Weeping Vine'
'Foliage Set 5'


I tucked the 'Flowers Fine' in amongst the hand painted roses.
 
I added white gesso to them and them a few shades of watercolour to give a cute rainbow effect.
You can see how I did this in the video below.


I added black gesso to 'Sharon's Butterflies' and also to the 'Weeping Vine' which I cut up and tucked in amongst the flowers.


I painted the 'Thankful Script Title' in white gesso, then white acrylic paint, and then added some Dimensional Magic, or Glossy Accents to give it a resin look finish.


I also added white gesso and white acrylic paint to some of the leaves in the 'Foliage Set 5' Set.
 
I then added some doodling with a black pen.  Love this fun look.


I tucked them in amongst the flowers too.


If you know my work, you know I adore colour, and I love that this page is filled with colour!!
 
I also love how the chipboard enhances the flowers and adds some texture.


I've created a video - so you can see exactly how this came together.
 
I hope you enjoy it.
 
Here it is.....


I hope you've been inspired to get creating.
 
I'll be back again soon with another share.


Friday, 12 October 2018

A letter to myself

Hi everyone
So today I'm sharing with you something very personal, a layout I created for Scrap Matrix and their current challenge. It's about something that I have struggled with over the years.
I am definitely putting myself out there and I am actually terrified.  But I am doing it for a few reasons.
  1.  It's something I've been meaning to do for years, but never have - always making excuses.
  2.  I believe scrapbooking/creating is a highly personal as well as therapeutic process.  It is definitely somewhere I turn in times of stress.  I need it to cope with life's challenges. So it's important that I scrap the darkness as well as the light. 
  3. I'm all about words and photos. About telling your story. So much of what we create now has no journaling, no handwriting. My voice, my words are an integral part of my creating. If I don't have a story, then I struggle - I just sit and shuffle. For me, the story is the base for everything else, it's the spark.
  4. Maybe, just maybe this idea will resonate with some of you.
  5. It's therapeutic for me. I need to do this. This is a safe space. It's my space.
So here goes....

As soon as I saw the 'You've got Mail' Challenge, my mind began whispering "it's time..." I tried so hard to ignore it, but it was very persistent!

I have written myself a letter, a very important letter of forgiveness and acceptance.


So it's titled 'Just for You' and it begins 'Dear Me' and ends with 'Love Me'.


Once I'd made the decision to create this page, it just kind of happened, it flowed out of me and onto the paper and I'm so glad it did.  The words were added without a draft, there was no need to practice, my heart knew what it needed to say.

It was so therapeutic.

As this page was all about myself.....I decided to have a go at hand painting and then fussy cutting some roses and leaves (something else I've wanted to do for a long time) and mixing these up with my favourite 'Aall & Create' Stamp.

So let's look at how this page came together....


I began by adding a thin layer of white gesso to some white cardstock.

Whilst this was drying, I began painting my roses and leaves.


I used my Prima Watercolours - I have 'Tropical'.  I LOVE the colours.
I ended up not using the yellow roses or the green leaves, so they are on my desk waiting for something else.


Once dry, I cut them all out.


I then stamped using Archival Ink and that gorgeous AALL & Create Stamp.  As you can see they didn't stamp perfectly - I need to refill my ink I think. (lol - I sound like Dr Suess!) but that really doesn't matter. I'm happy with imperfection.
If an area really bothered me, I just went over it with my Fudeball black pen.

Ok, time to go back to the background.


I used the 'packaging technique' for the background. 
I added some watercolour to some old plastic packaging, and then I turned this over onto my backround, smoodging and smooshing as I went!!


I really love the effect this technique gives, and the amount of control I have over where the paint ends up!


I then added layers behind my photos, and I created some tags from leftover scraps of paper.


I began poking these out from underneath my photos.


I then began to add the flowers and leaves - I wanted them to look like they were cascading down the page.
I also knew I wanted to write the letter directly onto the background and so I made sure I left enough space for that.


Time to write that letter....
I added a 13Arts Clear Sticker as my title.....I popped this down first so I knew where to start the words.


Some of the flowers are adhered with foam dots to give extra dimension.


I love the look of the black and white stamped images alongside the bright flowers.


I added a few embellishments too - a little chippy heart and that gorgeous 'German Scrap Pen Nib'.


I also added in some 13 Arts Clear phrase stickers.....they were just perfect, and I love the way they become part of the background.


I will definitely be using more painted flowers in the future..... I see a whole new style evolving.


Have you thought about writing yourself a letter?.......what would you say to your 15 year old self? What does your soul need to hear?
I recommend it.

Here's a quick reminder of the moodboard to use for inspiration:

Just pop your entry in the 'You've Got Mail' folder over on our Scrap Matrix Shares Facebook Group. It doesn't have to be a scrapbooking layout....it could be an Art Journal page, some cards, a canvas. Just let us know what Scrap Matrix Products you used in the comments and you could win either a $20 voucher at the store or a chance to guest design in one of our upcoming challenges!!


I really hope you have enjoyed this post, don't hesitate to reach out to me.

Love Tam
xxx


Scrap Matrix products used:

White Gesso
White Bazzill
Watercolour Paper Pad
Prima Watercolours - Tropical
AALL & Create Stamp #20
13Arts Marta's Small Message Clear Stickers
13 Arts Stickers Clear - Secret Letter
13 Arts Paper -
7Dots Studio Paper Pad - Verano Azul
German Scrap Pen Nib Black
7Dots Airmail Die Cut Elements
Fudeball pen
Ranger Ink Black


Sunday, 7 October 2018

A 'special' 2 Crafty Chipboard Share

 
Today I'm here to share my latest 2Crafty Chipboard creation.
 
This one's titled:

"Special"


A fun bright page celebrating a special night away with my boy.


I used the following 2Crafty Chipboard:
 
"Special Script Title"
"ATC Tiny Hearts & Stars"
"Steampunk Gears Small"
"Steampunk Gears Medium"
"Interlocking Grid Panel"


I painted the "Interlocking Grid Panels" with black acrylic paint and cut them up and added them underneath my photo and layers.


The black against the gorgeous rainbow background really 'pops'.


I added some of the stars from the "ATC Tiny Hearts & Stars" randomly on the page.
 
I painted them with the same colour acrylic paint as the background.


I added a few clusters of both "Steampunk Gears Small" and "Steampunk Gears Medium".
 
I wanted them to look like they were cascading down the page - from top left to bottom right.
 
This helps create movement and flow.
 
I added paint in all of the colours used for the background. 
 
I didn't overthink it, just swiped it over and moved on to the next colour!


Just be rough and random!!
 
I love how the bright coloured paint ended up looking a bit rusty!!


To finish off the page, I added a Chippy Title - just love these and the loopy font ones are my favourite!!


I heat embossed the "Special Loopy Title" with white and I love that little pop of gloss.


So there you have it.....a bright, colourful layout....perfect for my boy.
 
Have you created with bold colours recently??
 
My number one tip is to always add black and white.  
 
It makes magic.


Wednesday, 3 October 2018

Dear Mama.....

Hi everyone, I'm here today to share my layout for the current 'You've Got Mail' Challenge at Scrap Matrix.
 
I love this theme......so many options.  As soon as I saw it, I knew what I wanted to do.
 
You see I've had these precious letters that my daughter wrote to me a couple of years ago. They are just beautiful, heartfelt and so very precious to me. I actually carry a copy around with me in my purse at ALL times.  I often sit and read them, and I think they bring a tear every time.
 
Anyway, I really wanted to preserve these letters, and now I have!!
 
Here's my layout.....


Yep, in that hand made envelope sits the letters.


So let's see how this came together......
 
I began with a gorgeous paper from 7Dots 'Writer's Block' Range.  The script feel is just perfect.
 
I knew I would add lots of colour.....yep it's gotta have colour, so I added a thin coat of clear gesso to act as a barrier/sealer to protect the paper.


Whilst this was drying, I grabbed another sheet from the 7Dots 'Writer's Block' Range.  I chose a darker colour, as a contrast to the  background.


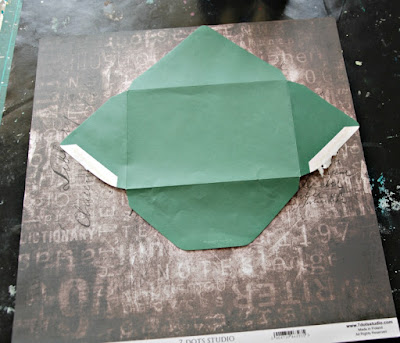
I grabbed an envelope that I had laying about the place, and I opened it up, and used this as a template.


I traced it and cut it out


I then taped it back together.....such a simple way to have a perfectly co-ordinating envelope.


Now it's time to add some colour to the layout..... you know how much I LOVE colour!


For this part, I used the 'clear packaging' technique.
 
I began with Dylusions 'Polished Jade', and spritzed some onto some old packaging, I also added some water.
 
I then turned this over and splodged it onto my layout. (super technical hey!)


I then repeated this process with Dylusions 'Lemon Zest'.
 
Then just a hint of  Dylusions 'After Midnight'.
 
*Make sure you dry in between each colour*


I then added some string to my page.


You will notice that these are vertical on the page, however, on the final layout they are horizontal.
 
When I got to the very end of the layout, I changed my mind and decided that this needed to change!
So I swapped the string to vertical.
I just felt it 'tied' in with the layout more (he he see what I did there)


I then added a few stamps to the background. 
 
I used AALL & Create #60. I used the circle/script/word section of this stamp.


I grabbed a Dina Wakley flower stamp and stamped this onto white cardstock using an Archival Black Ink.
 
I again used the 'clear packaging' technique to add colour to these stamped images.


I cut these out and began layering and tucking in and around my photos using both the flowers and lots of 7Dots Tags, again from the 'Writer's Block' collection.


For my title, I decided to use a tag I made from 7Dots paper.
 
I stamped onto it using these very cool Idea-ology Alpha Stamps.
 
I added some hand-writing, so that the tag read 'Dear Mama, Love Paige'


I then attached this to the envelope, making sure it could still open and close.


I added a few embellishments, including some 7Dots die cut elements from the 'Air Mail' range, a gorgeous German Scrap Pen Nib, and a cute metal envelope charm.  This just finished off the tag perfectly.


Aren't the pen nibs just gorgeous!!


Now it was time to add in more layers.......embellishments, tags, stickers, pen nibs, and the stamped flowers and leaves.


I added some journaling to a 7Dots tag, and some word stickers from 7Dots too.
Oh how I adore their products.


Here's the word stickers and embellishments I used by 7Dots.


I then spritzed some of these little white flowers in the Dylusions 'Vibrant Turquoise' and 'Lemon Zest', and scattered these amongst the layers too.


Love the colour combo, and the overall effect.


This layout has a special place in my heart, and I'm so glad this challenge was set as it forced me to create a forever keepsake.
 
What special keepsake/ephemera could you scrap, thus preserving the memories forever?
 
Head on over to our Facebook Shares page to add your entry, and let us know what Scrap Matrix Product/s you used.
Just pop it in the 'You've got Mail' Album.
 
Here's a reminder of the challenge:


That's it from me today.
 
I hope this has inspired you.
 
If you'd like to see more of my work head to my BLOG.
 
I will leave a list of the products used below.
 
See you again soon.
 
 
Scrap Matrix Products used:
 
7Dots Lost and Found Word Stickers
Dylusions Ink Spray - Polished Jade, Lemon Zest, After Midnight. Vibrant Turquoise