Tuesday 26 February 2019

This is my Happy Face for 2Crafty

Hi there, today I'm sharing my latest layout for 2Crafty Chipboard.

"This is my Happy Face"

I created a process video so you can see exactly how this layout came together.....


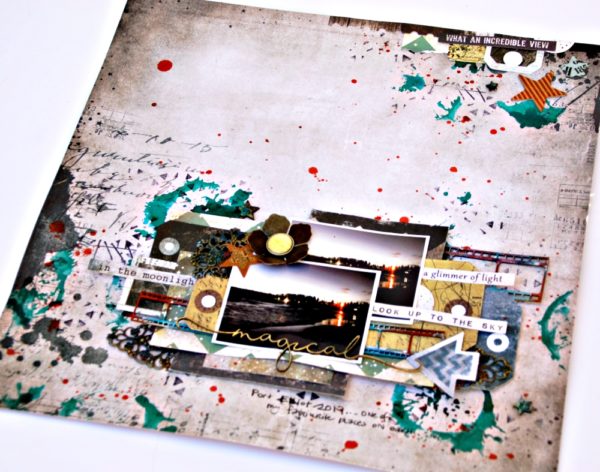
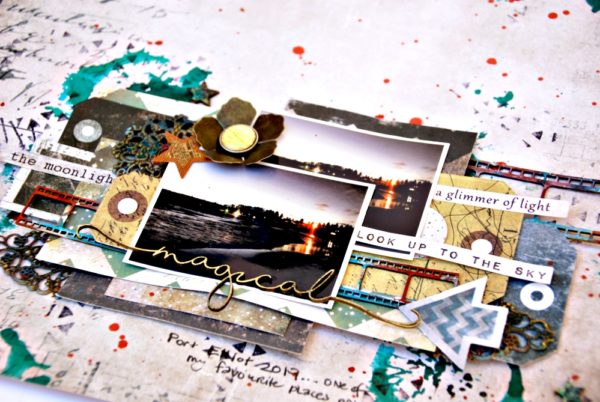
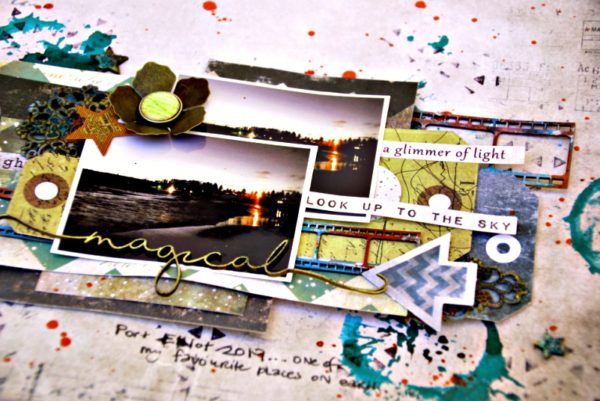
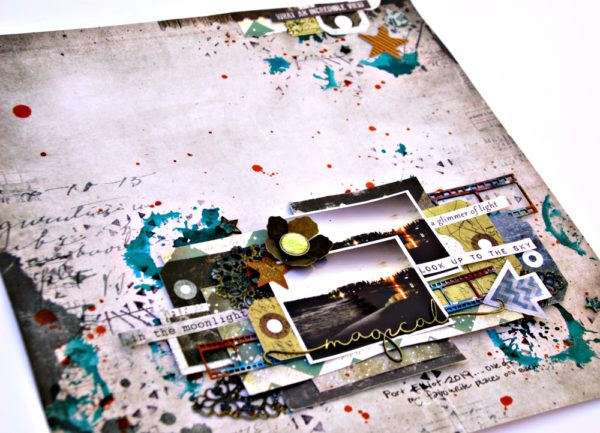
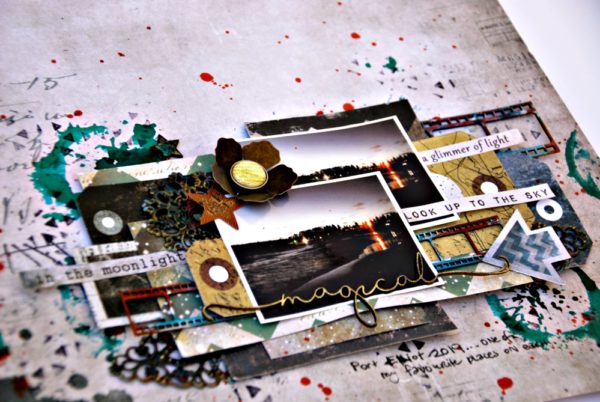
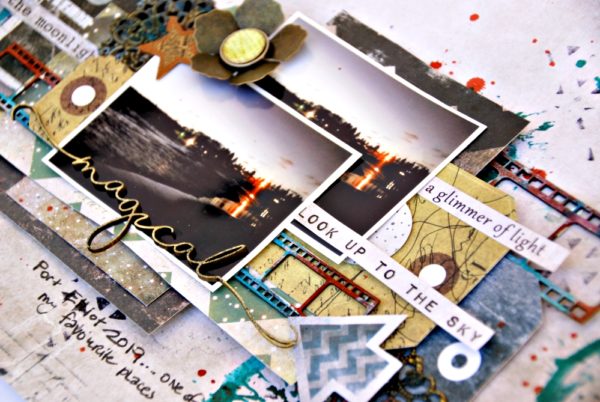
These photos are of my brother and myself and were taken quite recently.
I was trying to get a nice photo of the two of us, and this is the best we could come up with!! My brother does not understand the word 'Smile'.  In fact, the second photo is his attempt at a smile, so this title is just perfect!!!
I used the following 2Crafty Chipboard:
"This is my Happy Face Title"
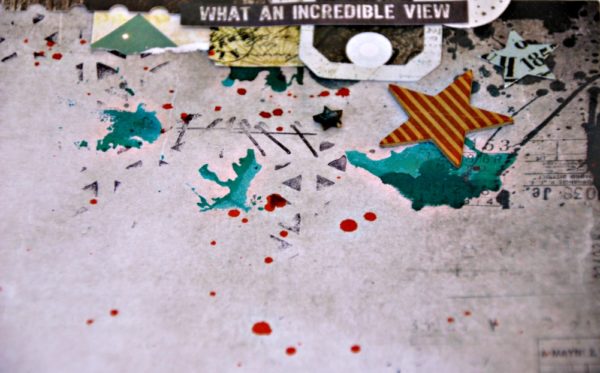
"Steampunk Strips"
"Geometric Arrows"
"Steampunk Gears Small"
As you'll see in the video, I cut the title in half as I felt that it suited my layout design better. I simply applied black gesso.  I LOVE this new title - always love having some humour in my layouts.  Not every layout suits the titles like 'cherish', 'wonder' etc so this new chippy piece really floats my boat!

I also applied black gesso to the "Geometric Arrows", and to some of the "Steampunk Gears Small" but I ensured they weren't totally covered. I kept some of the raw chipboard showing as I felt this gave it a more grungy feel which definitely suits my brother!!
Once dry, I swiped a little of the Art Alchemy Opal Magic in Aqua/Rose over the black - I love the greenish hue that occurs when swiped over black.
The effect on the "Steampunk Strips" was done by randomly adding a few different colours of Distress Oxides.


I'm really happy with the finish and the result.


All of these different steampunk designs suit my brother so well as he's into motorbikes and all things blokey.


Well that's it from me today.

I hope you've enjoyed this post and the video and I hope it inspires you to create something a little grungy!

You can subscribe to my You Tube Channel here


Saturday 23 February 2019

Guest designing 2 months in a row at 7Dots Studio!!!


Guess what!!!

I'm a Guest Designer again over at 7Dots Studio!!!!

It's always been a dream of mine, and I was thrilled that it came true last month.  What could be better than that????
Guest Designing AGAIN!!
That's what!

I'm on a creative high, so let's go and take a look at what they had to say about me.....


Hello friends. Do you miss Spring? I do.
Spending time outside, gazing at the stars… I do miss warmer days.


Tammy Klingner is today our Guest Designer and her layout will give you a bit of warmth

Let’s Meet....


G’day, my name is Tammy Klingner and I live in the beautiful Clare Valley in Australia with my two amazing teenage children. I have been scrapbooking in one form or other for 14 years! I can’t imagine not having the creative outlet. It’s my peace, my joy and my sanity. I absolutely adore colour and you will find vibrant colour on most of my layouts. I also love to use paint and all things mixed media!. I absolutely love 7 Dots Studio products and am so thrilled to be guest designing here. Thank you!


I was inspired by the gorgeous colours of the mood board and that magic light that was evident in lots of the images.

 Recently, on a family holiday we spent a night sitting at the beach, watching the sunset and then enjoying the view by the light of the moon. How lucky am I to be able to do this, to forget all my daily worries and just enjoy the magic of the moment. I used a photo I snapped on that night – it just fit the theme perfectly and by including it on this layout, it means I can always remember how magical the night was.


I began by adding some colour to the background by applying some Ink Spray onto my fave 7Dots Stamp – Hazy Days. That paint splatter appears on most of my backgrounds. It looks great in black ink and it also looks great in colour. I then added some stamping to my background using another stamp from this set and also a triangular background stamp from the Dreamscapes Collection. This time I went with black.


I then layered lots of tags and embellishments from a variety of 7Dots ranges as a background to my photos. I also added some to the top right corner of my page. This helps create the visual triangle that enables they eye to focus on the layout, and be drawn into it. I really love that all the 7Dots ranges complement each other. I love using a bit from this range and a bit from that range. It really makes the process fun and different every time!


I hope this inspires you to get creating, why not join in the fun of the 7Dots Challenge this month!
Thanks so much for having me. I’m thrilled to be asked to be a Guest Designer again!

There you have it.....

Thanks so much 7Dots Studio for having me again.

I also used loads of 2Crafty Chipboard in this one.

Here's a look at the challenge that inspired the layout.....


Love Tam
xxx

Tuesday 12 February 2019

An Art Journal Share for Scrap Matrix

Hi all, 
I'm back today to share another creation for the current Scrap Matrix Challenge -  using limited supplies.
 
Last time I created a layout on a white background, so I thought I'd create with a black background this time, just to mix it up a little.
 
Whilst searching for my black cardstock, I uncovered my black art journal that I'd purchased on the wonderful Tracy Scott weekend at Scrap Matrix.  I hadn't even used it yet!
 
So I decided that's what I'd do....plus the supplies we were sent really lend themselves to art journaling.


Now I really feel like a novice art journaller - I'm much more comfortable with scrapbooking layouts, and I'd LOVE to be able to attend some of Vicki's classes - what they create at those classes always has me drooling and I'd love to learn all the little tricks along the way.
 
But boy did I have fun with this one......


So let's take a look at how this came together.
 
Firstly, the supplies.......
 
This month, the design team all received 5 supplies in the post, and the idea is to play with only those, adding the bare minimum.
We each received 2 paints, a spray, a stamp and a stencil.

So here's the supplies I received:


Dylusions Ink Spray - 'Funky Fuschia'


I began by applying some of the 'Cut Grass' paint directly onto the page.
 
I then channelled my inner Lisa Oxley and lay down the 'Galaxy Stencil' and wiped some paint off using a baby wipe.


I then repeated this with the 'Ocean' Paint.


I then grabbed out the 'Dina Wakley Tissue Paper pack'.
I've been hoarding these!
Time to bust them open.


I wasn't sure if the face would show up on the colour, so I added some white gesso first.


I then added the face using 'Soft Matte Gel'.
Once the face was down, an idea popped into my head (up until now I had no idea where I was going).
Those stamps are architectural, like a house plan - Ah Ha - like a plan!
 
When I created my layout the other day, I didn't like where it was going, so I'd discarded my first attempt.
I don't like to waste ANYTHING, so I decided to revisit it.
 
Ok, so I'll get that part up to speed....
 
I'd added some Soft Matte Gel through the 'Galaxy Stencil' onto white cardstock.


I then added some watered down paint, but I think I added too much water and it kind of wrecked the paper in parts.


So I stamped the AALL & Create Stencil No 14 onto this card and cut out a whole heap of circles in different sizes.


I then added these randomly to my layout using Soft Matte Gel.


Once glued down, I added some of the 'Funky Fuschia Ink Spray'.
 
I love how it mixed with the blue and created purple!
I simply used my finger to swipe it over.


I then outlined these circled with black paint and a white gel pen, adding a few scribbles, trying to be messy and random.


I added some journaling to one of them.......
It reads "I had a plan...but I forgot where I put it"
 
Perfect for this page....for the process, for the stamps and for the stencil.
These circles represent all the different thoughts and plans that pop in and out of my head constantly!
 
I then used the AALL & Create Stamp to stamp a few of the words onto white cardstock.


I stamped:
Create Art
Create Love
Create You


Ta da!!


So what can you create with a couple of paints, a stamp and a stencil???

How creative can you get with a limited supply of products? Can you make less into more? Whether you are art journaling or scrapping, we can sometimes get overwhelmed with the idea of how much stuff to use... so this challenge is about stripping it back, using less and stretching your supplies in different ways.


Head on over to our Scrap Matrix Shares Facebook Group and load up your creations, including what products you used.  We love seeing them.
Your creativity inspires us so much. PLUS you could win a voucher from the shop or a chance to be a guest designer!!! Woohoo!
 
I'll be back again real soon with more to inspire you.
 

Thursday 7 February 2019

2Crafty Chipboard Share......
I get to be a CSI detective again!!

Hi there creatives
 
I'm back again today to share some more 2Crafty Chipboard goodness!
 
This one's titled:

'Escape'


A page that documents my passion for reading.
 
In 2018, I began a book club, on the spur of the moment with a friend, and it was an unexpected highlight for the year.


I used the following 2Crafty Chipboard:
'Hedgehogs'
'Mini Trees'
'Bookworm'
'Tree with Sparrows'
'Mushrooms'
'Mini Travel Word Set 2'


This layout was created for CSI:Colour Stories Inspiration.
2Crafty Chipboard are sponsors this month.
 
Have you ever had a go at their challenges? They are lots of fun.
Here's the one I solved:


As soon as I saw it, I knew I needed to document my reading highlight!
 
You can head to their blog to see the clues in detail.


Here's the clues I used:
 
The colours (not my normal go to colours!), stripes, distressed patterns, trees (chipboard, painted, pine), leaves, woodland creatures (hedgehog), bird, mushroom, string, splatters, metal (open book), wood (woodgrain paper, chipboard), journaling inside a handmade book (so cute!!!!)


Let's take a look at the chipboard.
 
For the 'escape' title from the 'Travel Mini Word Set 2' I applied black ink.


The 'mushroom' was first coated in white gesso, and then painted with watercolour paint.
I outlined the details with a black pen.


The 'hedgehog' was coated in a metallic wax and then I used sharpie pens to fill in the details.


The 'bird' from the 'Tree with Sparrows' was finished with the same process - some white gesso, watercolour paint and then pens to fill in the detail.


I had so much fun colouring in these chippy elements.


The 'Mini Tree' was coated with Metallic Wax, and then some green ink was added to the leaves.


The 'book stacks' were trimmed away from the worm in the 'bookworm' chipboard.
 
These were then coated with white gesso, and then various watercolour paints.
 
A touch of ink was swiped over them to pick up the finer detail.


I really enjoyed colouring these pieces of chipboard.
 
It's not my normal style to do this, but it was quite relaxing and I'm super happy with the outcome.
 
PLUS I had so much fun creating that background, and painting all those trees!!


When is the last time you tried something new?
 
I do love that about challenges, they push me out of my comfort zone, and often inspire an extra surge of creativity!!
 
That's it from me today, I'll see you again soon.