Friday 27 April 2018

Sharing my latest addiction....Round 1

Hi there crafty souls...

Today I thought I'd share with you my newest ADDICTION......Art Journalling!

Yep ok ok I'm a slow starter......I know, I know it's been a big thing for a while, but up until now I've made every excuse NOT to have a go (besides a few face sketches), plus between Project Life and my Design Team commitments, I knew that adding in another obsession would be a recipe for chaos.

BUT then three things happened.......
First I got some new goodies from Scrap Matrix, my favourite place to buy mixed media supplies, and I just wanted to try them out.......I wasn't organised enough to create a layout, but I wanted to PLAY.
Secondly, I've always drooled over the gorgeous Art Journal classes at Scrap Matrix and told myself "if only I lived closer.....I'd so do that". Sigh.
Thirdly, the amazing Lisa Oxley (I adore her style - she's a big fan of COLOUR like me) was participating in the #100daychallenge and her art journaling was popping up on my instagram and facebook feed, and it was making me so itchy to give this a go.......
....So I dug out my small Dylusions Art Journal, that I'd been hoarding and just decided to go for it.

For my first play I burst open some Tracy Scott Paints (I also love her!!). The colours are just amazing!!


I also used a 13Arts xoxo Stencil and a 7Dots Dreamscapes Geometry Stencil.
I just love those colours together. 

I decided to add a quote to each page. I'm a big fan of quotes, and just know when I'm in a bit of a rut, or when I've lost my mojo, flicking through these pages will inspire me.


This one is again using the Tracy Scott Paints, plus 'Ocean' by Dina Wakley.
I used a Heidi Swapp Circle lattice stencil and my favourite stamp set by Tracy Scott #9 on here too. I then added some random doodling and a quote I love.


This one was again created  using Tracy Scott Paints and Tracy Scott #9 Stamp Set plus that gorgeous 7Dots Geometry Stencil, and a cool stencil #7 by AALL & CREATE.


For this one I used some Dina Wakley Paints plus some stamps and a stencil from my stash.

I added some doodling and the quote - I find the Fudeball pen draws amazingly over the paint and the mixed media.....I must get some more of these....I can't tell you how many pens I have wrecked over the years.  But this one is brilliant.


Here's another page using Tracy Scott paints plus 'Ocean', 'Lemon' and 'Magenta' by Dina Wakley.

I again used the Tracy Scott #9 stamps and the 7Dots Geometry Stencil.


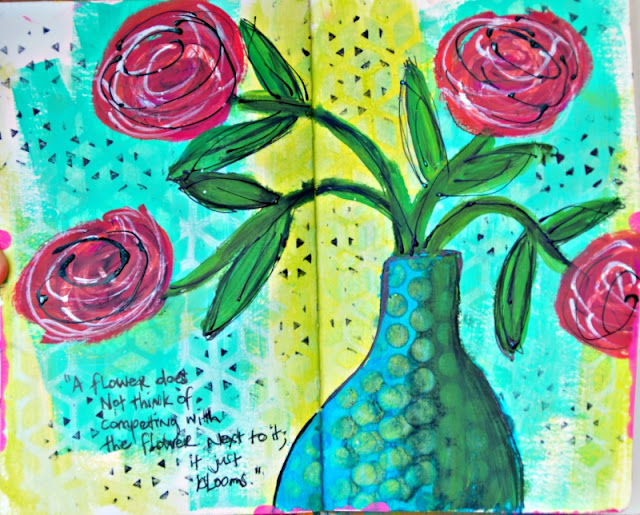
This one again uses the Tracy Scott Paint Set (can you tell I adore the colours)! plus the 7Dots Geometry Stencil, and 7Dots Dots Stencil. I also stamped with 7Dots Dreamscapes Stamp.
I added some scribbly swirls to the roses using IrResistable Pico Embellisher in Black.  I love that this adds some dimension.


For this last one, I used Dylusions Paints in 'Fresh Lime', 'Squeezed Orange' and 'Bubblegum' and some white gesso.
I also used a stencil by Tim Holtz called 'Honeycomb'.

I really love the quote on this one. Lots of doodling.

So that's it for Round 1!
Round 2 is coming soon! (Told you I was addicted!) Ha ha

I'm learning lots as I go, and I'm loving the small area - I can get 2-3 done at one time.  I also love that it's experimental. It's going to become a great little place for me to try out ideas before I add it to a large 12x12 paper.

xxxx


Saturday 21 April 2018

Scrap Matrix Monochramatic Challenge

Hi everyone!!
 
I've popped in today to share my first creation for the Scrap Matrix 'Tic Tac Toe' Challenge which happens to also be a Monochramatic challenge....... it sounds complicated ut it really isn't!
 
My colour is GREEN! which happens to be my favourite colour. So I can use green and neutrals.  Here's what I came up with.......

 
I also had to use a line from our Tic Tac Toe grid......
 
 
I went top to bottom, straight through the centre.....
Stamp
Big Title
German Scrap
 
 
So let's see how it all came together......
 
 
I began with some 'Marshmallow' Cardstock and added some 3D Gloss Gel through a 7Dots Geometry Stencil.  I focused it to the top section only - where I wanted my colour to be.

 
I then added Dylusions Ink Spray in 'Fresh Lime' and 'Dirty Martini', and added water to let it drip down the page.

 
Whilst this is drying I stamped some flowers using the Aall & Create Stamp No 20. I just LOVE this stamp.  I cut them out and then painted on some of the Dylusions Ink Sprays randomly.

 
I decided to add these buttons to a few of the larger flowers - the centre part of them hadn't stamped properly, so I decided to cover them up!! 
NEVER waste anything! Lol
 
 
I added a few layers behind my photos - some papers, 7Dots tags and some German Scrap.
I also coloured some white paper lace with the Dylusions Ink Spray in 'Fresh Lime'.

 
I then added in my stamped image, placing them so they cascaded down the page.
I adhered some flat, and some with foam tape to give them dimension.

 
I then poked in a few metal flowers.

 
For my BIG title, I decided to have a go at creating it myself.
I grabbed a botte of irresistible in black - I love how this has a really fine point, so makes freehand drawing simple. 
I love how it has a raised glossy finish.

 
I then cut this out and added it to my layout.
 

I left plenty of room as I wanted to journal.
Every year I select a word to focus on, inspired by Ali Edwards' One Little Word.
I always document my word and the reasons I selected it.
I thought I'd left plenty of room but NO! I hadn't.
 
 
A simple solution was to add the rest to a 7Dots tag and tuck that behind my photos.


Here's my journaling if you'd like to read it......
 
"Sometimes I need to regain control, to feel safe, to feel connected with the world.
Having the ability to choose gives me back my power, it empowers me.
I also want to choose wisely.
To make a conscious effort to choose, and not to go on 'autopilot'. Because it's up to me. I get to choose how I am going to react to the big things, the little things, and all the medium things inbetween.
I want to choose to be kind. To others and to myself.
I want to choose to see the natural beauty in the world.
I want to continue to choose gratitude - to notice and be thankful for all the little things.
I want to choose mindfulness - to be conscious of my thoughts and inner monologue.
I want to choose joy and happiness and cause a shift in my thinking.  A deep appreciation for life.
I want to choose me. Make time for the things I love."
 

My final step was to stamp with the 7Dots stamp - Hazy Days
I love that little stamp that looks like a paint flick,  I also love that I can place it exactly where I want it. Whenever I flick it always ends up where I DON'T want it.


And there you have it!
 
I really enjoyed creating this one, and working with just one colour.....what colour will you choose??
Remember you can team it with neutrals, and don't forget to be guided by a line in the grid above. 
The line can go any way - up, down, diagonal.
 
Don't forget to add your project to the Scrap Matrix Shares group on Facebook, and let us know which Scrap Matrix products you used.....it's not necessary to have a blog, just add your entry to the associated folder.
 
I'll be back again soon with another share!


Marshmallow Cardstock
Paper Lace - White

Saturday 14 April 2018

"Sightsee" for 2Crafty Chipboard

My second creation for 2Crafty Chipboard this month is titled:
 

'Sightsee'

 
I used the following 2Crafty Chipboard:
 
'Sightsee Title'
'Fir Xmas Tree'
'Thistle Shrub'
'Summer Leaf Stems'


I painted the 'Summer Leaf Stems' with a few coats of white gesso and tucked them in between my photos.

 
Next I grabbed the two 'Fir Xmas Trees' and trimmed off the star on the top and the pot on the bottom.  
They are the perfect shape for my layout (minus the Xmas feel) as this layout is about taking our USA family to my step-dad's home.  He lives in a forest, surrounded by Pines and Gums so these trees were perfect.
 
I then applied watercolours in various shades of green to achieve a dappled look.
 
 
To the 'Sightsee Title', I added a variety of Inks until I achieved a grungy, earthy colour I was happy with.
 
I placed this on top of my cluster.
 
 
I also added in the 'Thistle Shrub'
 
I left this raw, as I felt it went well with the earthy natural tones of the layout.
 

I really love all the natural fibres in this layout, and I enjoyed altering the chipboard to match in with this.
 
My paper and tags are all from Scrap Matrix - my favourite place to get all my scrappy supplies.


So that's it from me today, I'll be back again soon, in the meantime
Happy SCRAPPING!!!
 

Friday 13 April 2018

My first 2Crafty Chipboard Share.....includes VIDEO

I'm here today to share this month's projects for 2Crafty Chipboard.
I created a VIDEO tutorial to share with you all.
 

'This Boy'

 
A layout about my boy and his gift with children.  They love him  and he loves them!
He just has this real naturalness around them.
 
This is a photo of him with his little cousin from Texas, USA.
 
I used the following 2Crafty Chipboard:
 
"6 inch Revolution Frames"
"Chevron Bits"
"This Boy Title"


 I applied black gesso to the "6" Revolution Frame" and then embossed it with a
distressed rust emboss powder.  This gave it a grungy metal look.


I applied the same emboss powder to some of the 'Chevron Bits', but achieved a totally different look by simply applying white gesso first, instead of black gesso.


It looks much more rusty and copper in colour than the circle frame.
 
 
To the other parts of the 'Chevron Bits' I added various ink colours until I achieved a grungy look I was happy with.
 
I just love the versatility of  2 Crafty Chipboard!!
 
 
For the 'This Boy' title, I applied black gesso and then clear emboss powder to the 'this' part.
To the 'boy' section, I used various ink colours until I achieved the grungy look.
 
 
I love the titles with two different fonts, and I love finding different ways to alter them.
 
 
I've used a background paper from 7Dots Studio, along with loads of tags and stickers, all available from my favourite scrappy store, Scrap Matrix.
 
I also used an awesome stencil and stamp from Aall & Create, which is also available from Scrap Matrix.


I've created a video, so you can see EXACTLY how this page unfolded.
 
I hope you enjoy it.
I'd love you to leave me some love and feedback!


I'll be back again soon to share my second creation! 


Monday 2 April 2018

Scrap Matrix Textures Share

I've popped in today to share my second creation for the 'Texture' Challenge over at Scrap Matrix.
 
I'm loving this challenge and seeing all your entries.  You still have until the 14th of April to get these in, and today being Easter Monday, is a great chance to get some creative time in.


Lots of colour (as per usual!)


I had a lot of fun creating the feathers....


So let's start with how it all came together....
 
I began by adding white gesso to black cardstock. I kept this to the top of my layout......where I want the colour to be.


I then added Dylusions Ink Sprays in Pink and Lemon Zest. The yellow and pink blended together to create an orange colour....love when things you don't expect just happen....
 
 
Whilst waiting for this to dry, I grabbed some 'Marshmallow' cardstock - my favourite as it copes with Mixed Media and water without any prepping. I also got out ALL of my Dylusions Ink Sprays.....aren't they just beautiful!
Using the 'packaging' technique I sprayed each colour onto some old plastic packaging and then splodged it directly onto the cardstock.

 
I then got out this gorgeous stamp from AALL & CREATE. This one's designed by the fabulous Fiona Paltridge and I've been busting to give it a whirl.
I stamped the feathers onto the colour.
 
 
I also used a Kinder Kreations feather stencil and traced some feathers onto the colours.
 
 
I then got busy cutting all of these out.
 
 
I then went back to my background.
I added some black gesso using a 13Arts 'XOXO' Stencil
 
 
I then added White Gesso using another 13Arts Stencil.
Lots of texture!!!
 
 
Whilst this is all drying, it's time to work on the photo, and the layers around it.
 

I added loads of layers - papers, tags, stickers and my title around my photo.
I attached this to my layout using foam tape to lift it off the background.
 
I also added Mesh Tape to my background, I love the texture this gives.
I also added some German Scrap to the top of my layout and a strip below my photo.
 
 
I added colour to some lace as well to add more texture.
 
 
At this point there seemed too much colour (I know, can you believe it!!) So to balance this I added a black border to my photo, and also added the white die cut flowers in a cluster.  These are cut from the Heidi Swapp pack.
I wanted these to look like a dreamcatcher with all the feathers cascading down so I also added some flowers which I coloured with Dylusions Ink Spray.


I cut some feathers from the 13 Arts Strength in Numbers Paper to add in too.
 
 
As you may have noticed, this layout tells a story.
It has a theme - feathers, wings and free.
My daughter collects dreamcatchers, so I was inspired by that when putting this layout together. 
I also wanted my journaling to fit into this theme.
I even added the cutest little metal wing charms on either side of the photo - right where my girls wings are!


Well that's it from me today.
 
As I mentioned above, there's plenty of time to enter our 'Texture' Challenge - there's even a guest DT spot up for grabs - we'd love you to come and PLAY with us. So get creating and add your entry to the Facebook Scrap Matrix Shares group - specifically in the 'Textures' Album, and don't forget to list the Scrap Matrix products used. It really is that easy.
 
You can see my list down at the end of this post (yep it's a long one, but I adore Scrap Matrix Products!!!)


Black Bazzill
Marshmallow Cardstock
Dylusions Ink Spray - Crushed Grape
13Arts Stencil - Aria Song
Mesh Tape