Friday, 31 May 2019

Tam's latest 2Crafty Chipboard share

Hello there!!

Just popped in to share my latest layout created for 2Crafty Chipboard.

It's titled:

"Love that Smile"


A layout celebrating special time with my gorgeous girl.


I used the following 2Crafty Chipboard:

"Love that Smile Title"
"Sharon's Butterflies"
"Lattice Leaves"
"11 inch Fine Floral Frame Set"
"12 inch Revolution Frames"


I coated everything with white gesso.

I then added white acrylic paint to the largest of the "12 inch Revolution Frame" and used this as the base for the layout.

I then used Dina Wakley Scribble Sticks to add colour to all the other pieces.

I love the mottled effect this gives.


I mixed the colours on the "11 inch fine flowers frame" - some pinks, some purple and some blues.


I love the variegated look and I really love the detail in the flowers and leaves.


I used a few different greens in all the leaves too, including the "Lattice Leaves".

I layered these on top of the circular frame, tucking a few paper flowers underneath.
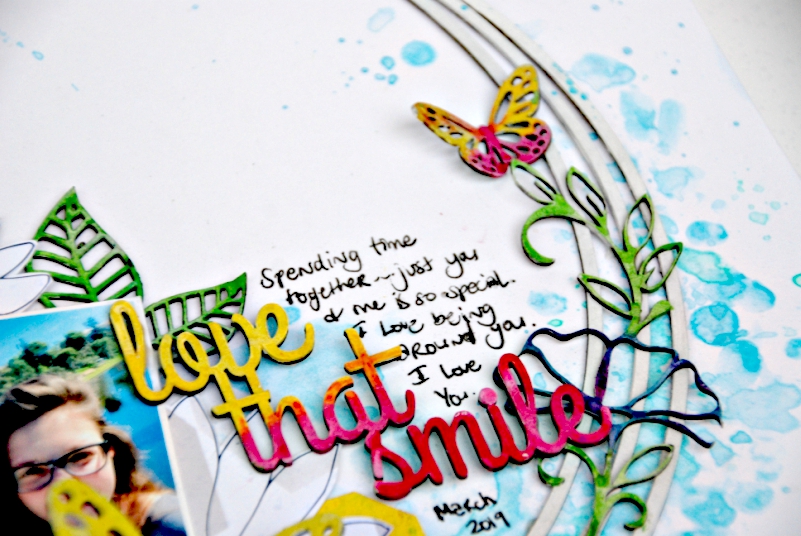


I chose pink and yellow on the "Sharon's butterflies" and on the "Love that Smile title" as this gave a beautiful contrast to the flowers.

How gorgeous is that ombre effect?

Why not give it a go?

I hope I've inspired you to try adding Scribble Sticks to your chipboard!


Sunday, 26 May 2019

Fun Times with 2Crafty Chipboard

Hi there Creative souls.
I've popped in today to share my latest for 2Crafty Chipboard.....
A fun layout celebrating a very special friend and all that we have in common!!
Cats, books, paint and GIFS.
This girl supports me in every way, and makes me smile daily with our silly banter and GIF conversations.
We have whole conversations with only GIFS, and when I'm having a bad day, well geez it makes me laugh.
I used the following 2Crafty Chipboard:
"Decorative Dangling Bits Set 1" *NEW*
"Aztec Flower Set 1" *NEW*
"Mini #Word Set 2"
"Doodled Frames"
I added black ink to one of the "Doodled Frames" and also to one
of the "Decorative Dangles".
I love the contrast of the black against the gorgeous teal colour.
.I painted those gorgeous NEW "Aztec Flowers" in white paint,
and then added a few swipes of teal ink.
They are so intricate that they didn't need anything else. 
They shine on their own.
I used two of the words from the "Mini #Word Set 2"
 - #funtimes and #joy.
I simply added white paint to these.
Such a fun layout to create and I just love those quotes!!!
Absolutely PERFECT for US!!!


I hope this has inspired you to get creative......
Using 2Crafty Chipboard certainly makes it EASY!!!
Luv Tam
xxx


Tuesday, 7 May 2019

My latest 2Crafty Chipboard Share

Today I've popped in to share my latest 2Crafty Chipboard creation, which is aptly titled:
 

"Today"


A layout that celebrates back to school for the three of us in 2019!


I used the following 2Crafty Chipboard:
 
"Today Loopy title"
"Squiggle Strips Set 1"
"Stars"
"2019's"
"ATC Tiny Hearts and Stars"


The "Squiggle Strips" were coated with black ink.
 
These are quite NEW and I just LOVE them!!
So fine and funky.


The "Stars" were coated with Distress Oxides in 'Peacock Feathers' and 'Lucky Clover', and then finished off with some black ink around the edges.


The "Tiny Hearts and Stars", "Today loopy title" and "2019" were all painted with a gorgeous lime paint and then swiped with black ink.


Love the grungy feel to this page.


That's it from me today.
 
Much love
xx


Friday, 26 April 2019

'Grateful' for 2Crafty Chipboard includes a PROCESS VIDEO

Today I've popped in to share a creation using 2Crafty Chipboard.
I've also included a process video too!!!
This layout is titled:

'Grateful'

A layout that celebrates and documents our beautiful neighbours.
So grateful for them and to them, and love having them in our lives.
Let's take a look at the video  as that best shows you how this came together....


I used the following 2Crafty Chipboard:
"Heart Clusters"
"Grateful title"
"Rose Set"
"6 inch Circle dot frames"
"Mini Branches"


As you can see in the video, I began by coating all of the chipboard in white Gesso.

To the "Heart Clumps" I added white paint.

I then added some doodling with a white pen.


I followed the same process for the "6 inch Circle dot frame".
The 'Grateful title' was painted with some soft watercolours.
I really love this look on chipboard.
It gives it a softer look, rather than bold.
Also, as it's soft it can be added over the photos slightly, without detracting from them.
To the "Rose Set", I also added watercolours.
Such a great finish.  Love the variance in the depth of colour.
I just LOVE the "Rose Set" chippy and could use it over and over (in fact I do!).

Finally, to the "Mini Branches", I stamped with a script stamp over the top.


This is a really simple, yet effective way to personalise your chippy.
Love it!


So that's it from me today.
I've been really enjoying playing with more softer colours lately.
So often, I am drawn to bright colours, so it's really nice to mix things up a little!!
I'll see you again next month with more chipboard creations!
See you again soon!


Friday, 12 April 2019

Flying in with TWO Art Journal Pages

Hello there creative souls.....
 
I've popped in to share my second bit of creating for the awesome 'FLY' challenge over at Scrap Matrix.
 
I've created TWO Art Journal pages......
 
The first is......


I used the quote:
"Take these broken wings and learn to FLY"
 
and yup now you are all singing!!!


I used my black 8x8 Journal and brushed on some white gesso first.
 
To create the background I used a stencil by The Crafter's Workshop called 'Sweet Posy'.
 
It looks fabulous every time, I just use sections rather than the whole 12x12 shape.


I recently purchased a soft pink Dylusions paint called 'Rose Quartz'.
 
I have most of the BRIGHT colours, but sadly, am very lacking in the soft tones.
 
Time to try something different!!


 I also added some Dina Wakley paint in 'Fuschia' and my go to 'black' and 'white'.
 
I love the grey I achieved by mixing.


To create the feathers, I used a Kinder Kreations Stencil.


I simply used a pencil to trace with the stencil directly onto the page.
 
I turned the stencil over to ensure the feathers were going in different directions.
 
This gives a more natural 'floaty' feel.
 
I then painted over them with the above paints.


I really just 'winged it' until I was happy.
 
I added dots, and once dry a few simple pen marks using my Fudeball pen.
 
I added a few flicks of the paint as well.


I then hand drew some little birds.....I wanted them to  look like they were coming off the feathers.
 
I added my quote in and done!!!
 
 
Time to share my second creation......
 
For this one I cracked open my Dina Wakley 8x10 Journal!
EEEEEEEKKK!!


This one began as I had a leftover scribbled flower from the last page I created.....
 
I couldn't waste it so.......


I firstly created a face using Scribble Sticks.....


I added water to the scribbles to allow the colour to drip down the page.


You'll notice I only created half a face.....
 
I can never seem to match up the eyes, so I cheated and added my quote to that section.


I used Ideaology alpha foam stamps by Tim Holtz and just added my own handwriting.


I then stamped a few of the Paper Artsy Tracy Scott  'Scribble flowers' above the face, in both the small and large size.


I added some Dina Wakley paint in 'Turquoise', 'Lemon' and 'Blushing'.


I love these pastel hues together.


This is the same technique I used last time, so you can see step by steps of that HERE.
 
I added the leftover flower from my last page over the top of some of the flowers and love that it sits up off the page a little.
 
So that's it from me today.....
 
I hope it's inspired you to have a go at our 'FLY' Challenge.


Just head to our Facebook Shares Group and upload your creation!
 
Let us know which Scrap Matrix Products you've used.
 
I can't wait to see them!
 
Colourful hugs,
xxx