Tuesday, 27 August 2019

Tropical Sunset for 2Crafty Chipboard


I've popped in today to share my latest creation for 2Crafty Chipboard.


A layout about a night I don't ever want to forget....
An amazing meal, floating on water, on a balcony, overlooking the sunset!
WOW!!


Look at all that gorgeous chipboard!!!
I didn't need to add much more...when the chipboard is so stunning, it does the  hard work for you!!

I used the following 2Crafty Chipboard:

"Tropical Sunset Title"
"Summer Leaf Stems"
"Cheryl's Floral Frame Set"


Let's take a closer look......

I began by applying white gesso to ALL of the chipboard.

I then used watercolours to add colour to the flowers and the frame.


I trimmed the flowers from the smaller frame in the "Cheryl's Floral Frame Set", and added them to the top of the larger frame.

I added some doodling with black and white pens to add some definition.


I love how these flowers look and I really like the colours too.
I tried to go for a more pastel look.....but somehow colour ALWAYS takes over when I create.
I guess it's 'my thing'.

I trimmed down some of the "Summer Leaf Stems", and applied white paint and a few doodles with a black pen.
I then poked these in amongst the flowers.


For the "Tropical Sunset Title", I added watercolours in an ombre effect.  
I only did this to the Tropical word, I purposely left the word sunset white, for contrast.


There you have it!


Monday, 12 August 2019

More doodling fun for Scrap Matrix

Hi there lovelies,
I'm back to share a few more creations with you inspired by the very cool 
'Mandalas and Zentangles' Challenge over at Scrap Matrix.

I can't seem to stop at just one now, so I go with it!

First up.....
a scrapbook layout


Yep, of course HEAPS of colour!
A giant mandala!


So to start this one I grabbed a few supplies.


I laid the Sweet Posy stencil over my cardstock and marked the edges with a pencil, so I knew where the paint approximately needed to end.


I then began painting in a fan style.


I used Dylusions paints in the following colours:
Fresh Lime
Cherry Pie,
After Midnight
Lemon Zest
Calypso Teal
Crushed Grape


Once dry, I laid down the Sweet Posy stencil, and using Black Paint by Dina Wakley, I rubbed over the stencil using a DRY baby wipe.


and this is what you are left with when you lift the stencil....


I wasn't happy with the way it wasn't centred properly, so I grabbed a Tracy Scott stamp, stamped a Mandala and then cut that out to cover it up.


I then layered around my photo.

I used a few Dies Cuts from Art by Marlene, some whimsy Stickers for the title, another Mandala stamp by Tracy Scott, a sticker from the Pinkfresh Embrace the Ordinary pack, and a MAMBI chip.


I feel that is all that is needed with such a bold background.

I then scribbled with my fudeball pen around the edge of the giant mandala.


Once I stood back and looked at the finished result, I felt that I should have added my paint in circular patterns rather than a fanned look.

It bugged me....
so I went with it and created a very quick art journal page
The whole thing took about 10-15minutes.


This time I used some Dina Paint in:
Lapis
Peacock
Lime 
Lemon


Love those colours together...

So yep this time I just painted circles.


I then grabbed a smaller mandala stencil, and again the Tracy Scott stamps.


To one of the circles, I used the technique above with the baby wipe and black paint.


To the others I stamped some of the mandala stamps, and then added lots of doodles and scribbles.


Finally I added a quote from the Tim Holtz Stickers.

So let's take a look at the challenge.....


I just couldn't go passed that image in the top left corner.....
I just had to have a go....


So let's take a look at this one....

I began again with the Tracy Scott stamps...

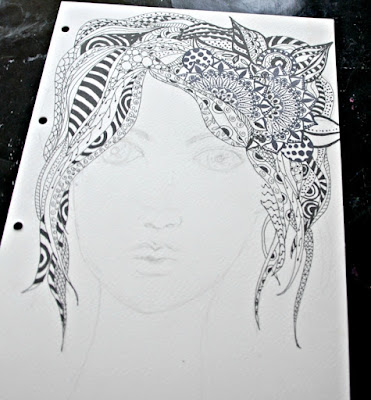
I wanted to add them into the hair (like the image)
so I stamped half a one onto my page


I then used a cut out stamp as a mask and stamped again.


I repeated this using some of the smaller stamps in the pack.


I then began to add in hair and the face.


Once sketched, I went in with my fudeball pen and began to doodle.

This part is so relaxing....don't overthink it, just do it.


Look at that glorious sun coming in my scrap room!!
Not great for the photos, but definitely lifts my mood.


Ok done!!

Time to add some colour.
I used the Bold and Bright watercolours by Art by Marlene.


I left a few black and white for contrast.


I then added a sticker from the 'Art by Marlene' Whimsy Sticker pack.


So after all that, that's it from me today!!

I can't wait to see what you clever people come up with for this challenge.
Just load your entry into the 'August' Album over on our Facebook Shares page.

See you next month
xxx


Scrap Matrix Products used:

Tim Holtz Stickers

Wednesday, 7 August 2019

PROCESS VIDEO for 2Crafty

I'm here today to share a layout for 2Crafty Chipboard andit includes a PROCESS VIDEO!

It's titled:

"Find your Tribe"


This layout is full of rainbow colour and celebrates my girl and her recent trip to Canberra with the National Youth Science Forum.
A real honour and thrill for her, and a highly sought after experience.


I've created a PROCESS VIDEO  so you can see exactly how to create that rainbow background and embellishments.

Here it is:


I used the following 2Crafty Chipboard:

"Frames Flowers"
"Polaroid Assorted Frames"
"My Tribe Title"


I began by adding black gesso to the "Frames Flowers" and then I used white pen to create a stitched look.

This made a great contrast to the rainbow background.


To the  "My Tribe" title, firstly I removed the 'my' - it just suited the story better.

I then applied white gesso and used the same colour watercolours that I had used in the background to coat each letter.
Conveniently there were 5 letters and 5 colours.
This was just a fluke, but I had one of those YES moments when I realised it would work!


Finally, I added some black pen marks to highlight it and add to the fun feel of the layout.


I used three different sized "Polaroid Assorted Frames".
I coated them with white gesso and then again added watercolours.
This time I allowed them to bleed into each other.


I created one in full rainbow, which I attached on top of the photos, to draw attention to my girl.

I created one in blues and greens, and one in reds and oranges.
I made sure I placed them on their respective sides of the layout, so they went with the background.
This just creates flow.
If I'd placed them on the opposite sides they would have 'fought' with the background colour.

I again added pen marks to look like stitching.


There you have it!
A fun and vibrant layout that definitely suits a bunch of teenagers!!!

I'll be back again soon!