Tuesday, 13 February 2018

First February 2Crafty Chipboard Share

Tammy here today to share my first creation for  2Crafty Chipboard with you.
 
It's titled:

"Love this Life"


I used the following 2Crafty Chipboard:
 
"Fine Hearts Borders"
"Love this Life Title"
"Grid Panel"
"Film Strips Medium"


I used one of the papers and lots of the tags from the new 'Paint Chips' story from 7Dots Studio.  These are all available from my favourite scrappy store Scrap Matrix
 
 
I cut the 2 Crafty "Grid Panel" into pieces, applied a few coats of white gesso and then tucked them underneath my photo layers.


I also applied white gesso to the "Film Strips Medium"
 
I added a strip of this under my photo, and I also added a small piece to the left hand bottom corner of the layout.  This gives the layout some balance, and draws the eye into the photo.


I then added in the "Fine Hearts Borders".  Again some in the cluster at the bottom, and some behind the photo.
 
I added a few layers of Distress Ink to these until I was happy with the purplish hue I had created.


I love the "Love this Life" title.  Lol.
 
I love the two different fonts. To enhance this I decided to use two different Ink colours. 
I then added some embossing ink and some clear emboss powder.
 
I really love this effect.


I'm really happy with the colours in this one, I think they work perfectly with the photo.


Saturday, 3 February 2018

Guesting for CSI

Hi everyone

This month 2Crafty Chipboard is sponsoring CSI, which is such a cool challenge site.

I've actually never had a go at solving one of their cases, so I was keen to have a go.

I really enjoyed it.  I've always felt daunted by it all, but it actually was a lot of fun and not overwhelming at all.

I encourage you to have a go.


Here's a look at the challenge:
 
 
I solved Case 247 by taking inspiration from the above scene and also using some of the traditional clues.
 
I used the colours, in fact even how they were lined up!
I used a white background, florals, leaves, bird (flamingo) and rub-ons (these haven't had a workout in years so it was kinda cool to use these again).
I also documented a summer memory and used rhyming words in my title.


I used the following 2Crafty Chipboard:
"Summer Line Words"
"Alpha Set 1"
"6" Flamingo Frame Set"


I painted the Fun from "Alpha Set 1" black and did the same to the sun from the "Summer Line Words".
 

I used Distress Ink to colour the "6"Flamingo Frame" and I then applied embossing ink and clear emboss powder.


I loved using up some old bits and pieces from my stash.


Friday, 2 February 2018

Another holiday creation with Scrap Matrix

Hi all!
 
Happy to be back sharing another 'Holiday' Creation for Scrap Matrix.
I've created step by steps again so you can see exactly how I created this one.
 
I could do so many for this one. I think it's a time when we tend to take more snaps, but aren't that great at actually scrapping them and documenting the story.
 
Without further ado..... Here it is.....

 
A layout capturing our love of boogie boarding and wave chasing.
 
To go with the beachy vibe, I decided to use Kraft as my background. 
 
 
 I added heaps of woodgrain papers and tags to really give it that beachy feel, and teamed it with some painted stripes for a funky teen/surfy feel.
 
 
So let's get started on creating this one......
 
First up select your papers.  I chose Kraft, some 7Dots, Blue Fern and Pinkfresh.
 
 
I painted white vertical stripes onto the Kraft paper using Dylusions paint.
Don't overthink this part.....just do it!
 
I then added a few splatters.
 
 
I added some stamping using some of the new stamps from AALL & CREATE and black Staz-On.


I focused the stamping around the area that my cluster and photo would be.

 
I cut out some different woodgrains. 
These are all on the reverse side of the turquoise woodgrain paper which is a 7Dots Paper
Love it when a paper is so versatile.

 
I made sure with the layering that the 'Wild and Free' was visible. This was just too perfect for my photo.  I HAD to use it.  In fact, it makes a perfect title for the layout.
I then slipped in a few 7Dots tags.

 
I really liked the turquoise honeycomb sticker from the 7Dots sticker sheet. 
 
I liked it so much, I decided to cut some more in various sizes from my leftover pieces of paper.

 
I added these to my layout in a way that created movement across the layout.


To finish off this layout, I added a few flicks of Dylusions Spray Ink in Polished Jade (my favourite colour), some thread, some word stickers and a touch of journaling.


There's still a couple of weeks left to enter the Challenge over at Scrap Matrix.
 
You have until the 14th February to load your holiday creations into the album over at Scrap Matrix Shares, and remember to list the Scrap Matrix Products you used in the comments to be in the running for a voucher from the Store.
 
Here's a reminder of the Holiday Challenge Moodboard:


As the challenge is all about holidays - this can mean so many different things to different people.
It could be a recent Christmas page, a favourite holiday activity or destination, a tradition you celebrate, or, of course, a trip you have taken - or maybe just a memento from that special holiday...... Anything that evokes a memory of holidays.
 

I can't wait to see what you come up with.
 
 
Scrap Matrix Products used:
 
Kraft Paper

Thursday, 1 February 2018

New February Challenge over at Scrap the Girls

Well January totally flew by, it felt like only yesterday it was Christmas, and suddenly the school holidays are over, Term One has begun and it's February!

So that means a new challenge over at Scrap the Girls.

This month we have a sketch....

 
As February is the month of LOVE, the loveheart theme is just perfect.
 
Here's what I came up with:
 
 
I had lots of fun with colour for this one.
 
I'm a big fan of colour - and for those of you that know my work, you will know that paint is one of my favourite ways of adding colour.


I used Prima Watercolours and Dina Wakley Paint - available from Scrap Matrix.
I love how the Dina paints come in a bottle with a fine tip - perfect for squeezing directly onto your layout!


I had a play with a few of the Metal Dies from Uniquely Creative.
These Dies are fantastic - they cut really well - so cleanly.

I used the following Dies:


I scattered a few of the hearts (the inner parts of the wreath) around the painted heart.

 
I used the Rose Die and the Leaves from the Flower Set and tucked these around my photo.
I really love the contrast of the white against the colours and the black.


I also added a leaf and a few hearts to the top corner of my layout.
 
I included a title from 2Crafty Chipboard - I love these hasthtag titles. They are fun and they really suit the theme of my layout.


A happy bright layout that documents my teen daughter, her friends and their 'lingo'.


This month Scrap the Girls is sponsored by D-Lish Scraps.  Check out their amazing products, so many cool scrapbook things!!


I can't wait to see what you create from this sketch.

The rest of the Design Team have done an amazing job - you can see their take on this challenge over at the BLOG.

Happy creating!!


Friday, 19 January 2018

Tam's first 'Holiday Challenge' Share for Scrap Matrix

Hi everyone,

I'm excited to be here today sharing the details of my first 'Holiday Challenge' for Scrap Matrix.

Such a great theme.....so many options!!!

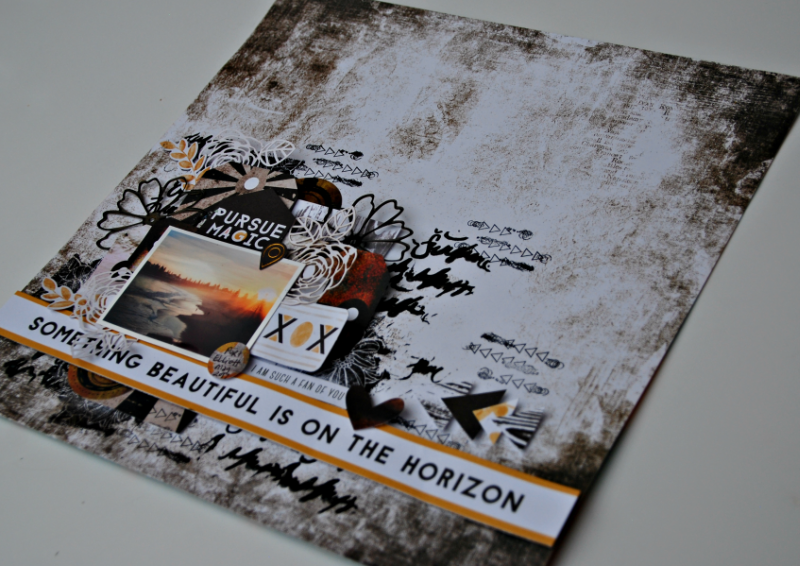
Here's what I came up with.....


I scrapped a photo of a gorgeous sunset from a little getaway in Port Elliott (one of my fave and most peaceful places on Earth), and yep right around the corner from Vicki and Scrap Matrix.
Uh oh!
 
As a child, my grandparents lived at Port Elliott, so many a school holiday was spent here.
Such fond memories.
 
For the past 4 years, we've been going there as a family for a few days - sometimes even a week! in the January holidays.
So special to share this with my kids and to begin new traditions.
 
So I began this page by selecting a few papers from both 7Dots Studio and also Pinkfresh - Escape the Ordinary.


I began by adding some black paint to some 3D Gloss Gel and then applying this with one of my new AALL & CREATE stencils.


I then used one of their stamps - I just love this one and can't wait to do more with it, but for this one I just stamped randomly, concentrating on where the edges of the photos/papers would be.
 
 
I then layered a few 7Dots Studio tags together, ready for my photo.
 
I trimmed a strip from a Pinkfresh paper to create my title.

 
I then did some stamping using these funky AALL & CREATE stamps, to finish off my background.

 
I then placed my tags and photo onto my layout. 
I then began tucking and poking.....
I used some of the Ephemera from the Pinkfresh range, some metal flowers,  and a few stickers from 7Dots Studio.


I also added some extra texture by trimming some of the roses down from Heidi Swapp's 6x6 Mixed media Pack, and poking them behind my photo.

 
 Lots of layers, lots of textures.....
 

You may notice a few tags and stickers from the NEW 7Dots Studio Paint Chips range.....I LOVE this range, and can't wait to get stuck into more of it!!
It's right up my alley with bold colours and black!!


I stuck with blacks, whites and mustards for this layout, as I really wanted that gorgeous sunset photo to be the focus.


Notice how the stamping and the stencilling is clustered around the photo?
 
Remember how I didn't stamp all over the background, just where I knew it would show....there's no point stamping everywhere and then covering it all up!


So there we have it.....my first Holiday creation......if only every day ended this way....with a gorgeous peaceful sunset.

 
 Don't forget to load your holiday creations into the album over at Scrap Matrix Shares, and remember to list the Scrap Matrix Products you used in the comments.
 
I can't wait to see what you come up with.
 
Here's a reminder of the Holiday Challenge Moodboard:
 
 
I'll be back again soon with another 'Holiday' Creation.
 
 
Scrap Matrix Products used: