Friday, 3 April 2020

It's all about ME, ME, ME!!

Hey guys
Well this month over at Scrap Matrix is particularly exciting for me.....cause it's all about being inspired by MY creations!!

I feel so flattered, a little nervous, and just a teeny bit famous! lol

So how did this become a challenge?
Well in April I was scheduled to teach a full weekend of classes at Scrap Matrix, but unfortunately due to all the uncertainty in the world right now, and the restrictions that are in place we have had to postpone.
At this stage, we haven't set a date, but when we do we will let you know.

Speaking of the uncertainty of the world, that's where my inspiration came from.
I was a little blocked, and couldn't seem to get creative. My heart felt heavy.
I was scrolling through Instagram and a post really spoke to me so I decided to use that as my jumping off point and that maybe art journaling might just be a good way to get it out and get me back into an arty headspace.....
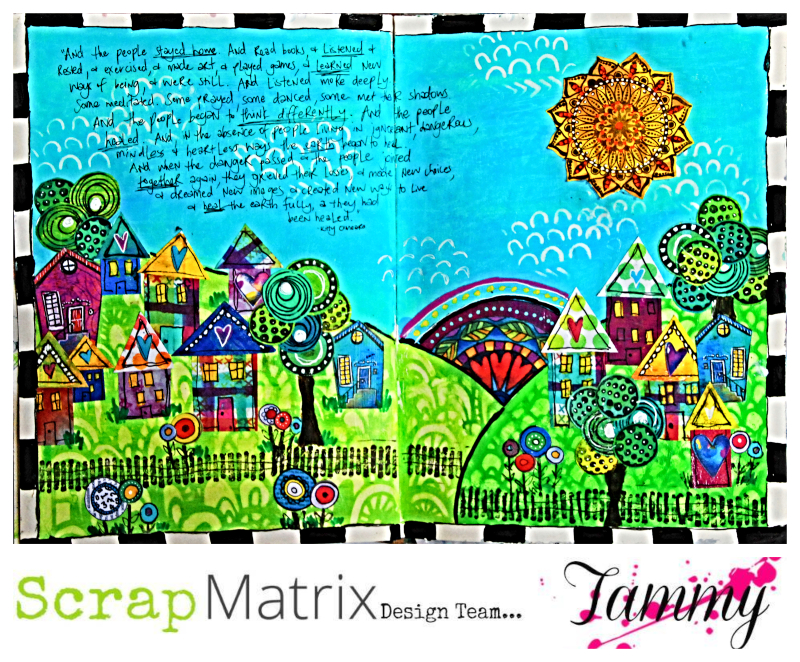

Can you guess where the inspiration came from?
Who remembers this page?


Yep that was my inspiration.
I love all the colour.....


and here's the quote that unblocked me...

"And the people stayed home. 
And read books, and listened and rested and exercised and made art and played games and learned new ways of being, and were still. And listened more deeply. 
Some meditated. Some prayed, some danced, some met their shadows. 
And the people began to think differently. And the people healed. 
And, in the absence of people living in ignorant, dangerous, mindless and heartless ways, the earth began to heal. 
And when the danger passed and the people joined together again, they grieved their losses, and made new choices, and dreamed new images, and created new ways to live and heal the earth fully, as they had been healed."
-Kitty O'Meara


Ok so let's take a look at how it came together...

I began by grabbing some Art by Marlene Collage papers, and some of my leftover papers I created in my last gel printing session.


Apply white gesso to your page and then add washi tape to the edges for a neat border.


I painted a hill on one side using Dylusions paint in 'Cut Grass'.
I then used a stencil and damp baby wipe to wipe off some of the paint whilst still wet.


I repeated this process on the other side, this time using Dina Wakley paint in 'Lime' and 'Evergreen'.
I used a TCW stencil called '6x6 Brick Poetry' and just focused on the arches.


I created the sky using a mix of Dina Wakley paint in 'Sky' and 'Turquoise'.
I used a TCW stencil '6x6 Texture Love' to create some clouds.


You may be able to see a stamp in the sky.
Prior to painting I decided to use one of Tracy Scott's Mandala's from the stamp set by Paper Artsy ETS23 for the sun.
You probably have worked out by now that I love looking at my stamps differently, turning them into other things.


But when I stamped it I stuffed it!!
Now remember there are no mistakes, so instead I grabbed some yellow paper I created in a gel print session and stamped onto that.


Next I cut it out and stuck it over the top.
Problem solved!


Ta da!!


I used  some more of Tracy Scott's stamps from the sets ETS23 set and the ETS09 set 
I stamped them onto various sheets of green paper from my gel print session.


I then cut out all the circles and they became trees!!


Next I cut out a heap of triangles and rectangles from the papers I had gathered.


These became houses.
I added a few hearts from the Art by Marlene Die Cut #4 Book.


Now time to create the little scene.
I adhered all the bits with Soft Matte Gel.
You may notice in the picture that my Maisy helped me, she often does!


This Carabelle stamp reminded me of a fence.
I wasn't worried about perfection, as I wanted the scene to be a little whimsical and rustic.


Adding a few lines turned it into an immediate fence.


Finally, I added the journaling to the sky, and a simple yet powerful border.


Love those cute little flowers, which are from the Art by Marlene Die Cut books.


There you go, a page inspired by both the current world crisis and Me, Myself and I!!


I just love that my art can bring me joy, and that it gives me an avenue to process what is going on around me.
It is just an added bonus if it inspires you!!

I hope that many of you may find the time for yourself and create something for our challenge.
Just be inspired by ME!!
There's a whole album which contains all of my creations for Scrap Matrix.
You'll find it HERE.

I really hope a few of you have a go and join us.
Just add your creation to the 'Tammy Album' in our Scrap Matrix Shares Facebook Group.
I'd love you to tag me, so I can see them (and feel just a little bit more famous) lol


Wishing you all peace, joy, strength and colour.
We are all in this together
Love and kindness

Tam
xx

Thursday, 12 March 2020

PaperArtsy goodness!!

Hello my creatives!

I'm back again to share my second creation for this month's awesome PaperArtsy Challenge over at Scrap Matrix.


I loved the stamp set EGL05 when it was recently released.
I think Vicki is out at the moment, but as we are such big PaperArtsy fans, just give her a hoy and she will order you one in!
I love it!!


So let's see where this one began.
First up create a background....


I added white gesso to my large Dylusions art journal and then took three of my fave PaperArtsy Paint colours - Zesty Zing, Bubblegum and Sargasso.


Start by randomly spreading some Sargasso.
Don't think about it too much.
Then whilst your paint is wet, add a stencil and wipe off some paint with a wet baby wipe through the stencil.
I used PaperArtsy Stencil PS158 (by Tracy Scott)


I then repeated this with the Bubblegum Paint, and then finally just a splash of the Zesty Zing.


Time to add....

I really adore the leaves in the stamp set, so gathered a few green PaperArtsy paints in Slimed, Green Patina and Lawn.
As I knew I wanted to do some stamping and fussy cutting I grabbed my fave paper - PaperArtsy Smooth Cardstock. It just copes so well with water and mixed media.
So hard to find a good paper like this, so when it was released, I was pretty excited and stocked up.


I added the green paints randomly for my leaves.
Doing this gives a lovely variegated look to the leaves - much more natural.


Now time to create some flowers.
I chose a few different colours in the the purple/blue tones, and some in the red/peach tones.
I then repeated the above process, ready for the stamping.


Looks a mess like this, but once stamped and cut out they look just great....


I just love the little birds in the stamp set and knew I wanted to incorporate these into my art journal page.


Once cut out, I felt the little bird needed a tail.
Yep! That flower bud stamp will work just fine.

You might be able to see my page underneath my hand. 
I got distracted at this point and forgot to take photos. Whoops!
I hand painted a branch using PaperArtsy Paints and then added a few leaves stamped in black directly onto the page.

I then added my stamped images around so that the birdies sat on the branches and the flowers and leaves were clustered.
I adhered them with soft matte gel.


As you can see in the above pic I added some detail to the birds and flowers using a white pen and a touch of paint.


I finished off the page by adding in some of the stems, by rubbing through the NEW PaperArtsy stencil PS164 - I just love this stencil, and by rubbing paint through, it gives these little stems that seem to tie everything together.

Again, Vicki has sold out, but if you contact her, she will order you one in.
Or choose a different PaperArtsy Stencil - so many to choose from.

As you can see in the below pic, I've used it over and over already.
Scrap Matrix is always restocking PaperArtsy as they are all our favourites!


Finally, I added a stamp quote from a PaperArtsy Stamp Set ETS31...


As that step was the finishing touch, let's take a look at some of the details.....


I love seeing your PaperArtsy creations appearing over on our Facebook Scrap Matrix Shares Page.
The possibilities are endless and every entry is in the running to win a voucher for the Scrap Matrix Store (so you can buy yourself some more PaperArtsy goodies! lol)

That's it today
Luv Tam
xxx


Tuesday, 3 March 2020

What do you see?
Switching it up with Paper Artsy Stamps

Good morning creative souls.
 I'm here today to share my first couple of Paper Artsy projects for the current challenge over at Scrap Matrix.

For this Challenge, I pulled out all my PaperArtsy Stamps and decided to look at them differently....
What could I create that's a little quirky and unexpected.


Meet Owlivia  and.....


 Finlay!

So let's see how they come together....

Let's start with Owlivia ....


I knew I wanted to use my new Paper Artsy stamps - Tracy Scott ETS38 and JOFY 90
I hadn't opened them yet, so this challenge came at the perfect time.

I also dug out an couple of older stamps - both Tracy Scott ones - one from her previous release Tracy Scott ETS34 when she was last in Australia, and one from a couple of years ago -

As soon as I looked at the mini mandalas I saw owl eyes.....
So I loosely sketched an owl with pencil onto some Art by Marlene Watercolour paper. Very very loosely - you don't need to be able to draw, this is just to help with placement of the stamps.


Once the eyes were in, I immediately saw wings instead of flower petals,
 and feathers instead of  carvings....


Lastly, the mandalas became ear tufts and feathers....


Ok, now I had the base of my owl, it's time to add colour.

Lots of blending of colours and flicks of paint...


I finished it off with some doodles and pen work....


Love those eyes!


I enjoyed this so much I just had to try another one.....

I used three of the same stamps, but I also added in another older Tracy Scott set ETS09
Oh and I used the Tracy Scott set ETS 35, I just forgot to take a picture.


Time to follow the same process as Owlivia...

Love hearts became lips
Flower petals became a tail
A spiral for an eye
Circles for bubbles
and carvings and flowers buds for fins....


For a couple of these stamped images, I didn't want the entire stamp - for example, I didn't want the stem from the flower bud, so a quick easy solution is to cover with a bit of washi before stamping.


Time to add the watercolour, and the extra details with the penwork...


Happy with the outcome. 
Just love those lips.


If you follow my work you know I have created a couple of critters using stamps before.


In case you missed them you'll find the link to the HERE.

I'd love you to have a go at this fun technique.
What else can you see in those stamps?
Stand on your head, squint - you may be surprised what you find.....

What are you creating with the current PaperArtsy Challenge?
I can't wait to see.


Much love 
xxx