Wednesday 21 March 2018

Tam's first Texture Share for Scrap Matrix

Hi everyone, today I'm here to share my latest creation for Scrap Matrix.
 
This month the theme is TEXTURES
 
Right up my alley!!
I'm a mixed media addict so textures and pastes, paints and stamps appear on just about everything I create.
 
Recently my daughter attended a prom.  She's just so gorgeous, and I normally prefer 'everyday' pictures but she was wearing the most stunning dress, so I got plenty of shots!
 
 
Yep, lady in red!
Red is not a colour I use a lot of and if I do, it's usually in small amounts, but this dress just called for me to go with the red.
 
I teamed it with neutrals and just let the red shine.
 
 
So I began by selecting my background sheet of paper and began by
adding black gesso with a cool stencil from AALL & CREATE.

 
I knew I wanted my photos to be towards the top of the page so I focused on this area.

 
I then grabbed some white cardstock.  I use 'Marshmallow' as it's perfect with water and various mediums -  no need to gesso first.
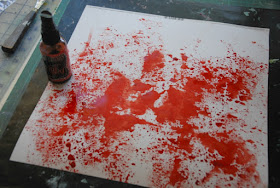
I then used the 'packaging technique'.  Apply some Dylusions Spray Ink to some plastic (left over packaging is perfect).  Add a spritz of water to get the colour flowing, and then splodge it directly onto your cardstock.
 
 
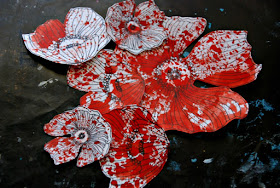
Using a black waterproof ink, stamp your images onto the cardstock.

 
I then cut out these stamped images.
You could choose to add more colour, but I like them just like this - some quite red, some more white - I love the arty look.


Now that my black gesso had dried, I stamped a few stamps onto my background.

 
I then cut out some pieces from this sheet (designed by the fabulous Fiona Paltridge).

 
I ended up not using the heart. Lol.

 
I then began to add it all together.
I adhered the photos using a few layers of foam tape, as I wanted to be able to tuck various tags, diecuts, gauze etc behind the photos.


This also allowed me to tuck the photos underneath.
I bent the petals upwards to give them more dimension.


I then tucked in a few of my favourite metal flowers.


Finally I added my title and a few word stickers plus the all important journaling!

 
And that is that.
A layout documenting my 'Lady in Red'.
 
 
Don't forget to head on over to the Scrap Matrix Shares group on Facebook and add in your creations using different textures/paints/stamping from Scrap Matrix.
There's so much to choose from, Vicki has the latest and greatest on the market!!
 
Just add it to the Album titled "Textures" and let us know what Scrap Matrix products you used in the comments section.
It's that easy - no need for a blog, plus you could win an awesome Scrap Matrix prize!  Vicki is very generous and we LOVE seeing what you come up with.
 
I'll see you again soon!!
 
 
Scrap Matrix Products used:


Wednesday 14 March 2018

My second 2Crafty Chipboard Creation for March

Hi Scrappy Ones
 
I'm back today to share my second March creation for 2Crafty Chipboard.
 
It's titled:

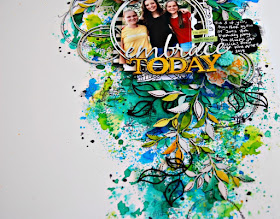
"Embrace Today"


This layout celebrates my gorgeous daughter and two of our very special family friends who now live a long way away, however we were lucky enough to have some time with them recently.
 
Definitely a day to scrap and remember forever.
 
I used the following 2 Crafty Chipboard:
 
"Embrace Today Title"
"Mini Branches"
"Handrawn flowers"
"6" Circle Revolution Frames"
"Word Circles - Christmas"


I began by painting all of the Chipboard in a couple of coats of white gesso.
 
I then added some watercolours to the "Mini Branches".
I used a few different colours.
 

I also used a black pen to outline a few of the leaves and to add a few dots.

 
I added white paint to the "6" Revolution Frames" and the two circles from the "Christmas Word
Circles Set".
This gave them a crisp finish.
 
 
I did the same to the "Embrace Today title", and then I added yellow paint to the today part.
 
I really love doing this to the 2Crafty titles when they have two different fonts.
 
I then outlined a few of the letters in today, and added some dots with a Sharpie.
I like the whimsical look this creates.


Finally I painted some of the leaves from the "Handrawn Flowers" in black paint. 
 
I really like the contrast this gives against the other leaves.
 

That's it for today, I'll be back in a few days with some more inspiration.
 
Until then, happy creating!


Tuesday 13 March 2018

My first March 2 Crafty Chipboard Share

 
Hi all!
I'm here to share my first March 2Crafty Chipboard creation with you.
 
My first creation is titled:
 

"#Funtimes"


A layout that documents our last night at our annual holiday at a beach in Port Elliott, South Australia. 
This place is really special to us and on the last night we all have a lot of fun hanging out together as the sun goes down.  Definitely something I wan to capture and remember.
 
I used the following "2 Crafty Chipboard:
"Today is Perfect Title
"Element Set 1"
"Crazy Stitched Panel"
"ATC Tiny Hearts & Stars"


I painted the "Crazy Stitched Panel" in black and trimmed this down.
 
I love using this to give my background some texture.
 
 
I painted the "Today is Perfect title" in yellow paint and then heat embossed it with clear embossing powder to give it a sheen/resin like finish.
 
 
 I did the same to the "Element Set 1".
 
 
I love the effect of this. That yellow is just gorgeous.


I applied some jade green paint to a few of the stars from the "ATC Tiny Hearts & Stars" and again heat embossed with clear embossing powder.
 
 
I love the pops of colour that the chipboard gives this layout.
 
I absolutely adore the background paper - it's a 7Dot's Paper from their Northern Lights Collection, available from my favourite scrappy store Scrap Matrix. 
 
I also used some 7Dots tags from their gorgeous Paint Chips range, plus there's some background stamping - for these I used Aall & Create and 7 Dots, again available from Scrap Matrix.


Well that's it for today, I'll be back with my next creation later in the week.


Friday 9 March 2018

Playing with Scribble Sticks

Hi there everybody, thought I'd pop in today with an extra share for Scrap Matrix.

I adore the Dina Scribble Sticks, but I have to admit that when I ordered them I was terrified.  The thought of just scribbling without a plan.....what!! I really haven't done a lot of Art Journaling, I'm much more of a layout kind of girl. So I was both looking forward to them arriving and dreading it at the same time. When they did arrive, they sat on my scrap desk for a while.....and tormented me.

Anyway, eventually I had no more excuses and decided it was time.

Something I have always wanted to do is draw a face, but I never have - where does one start?   So I decided to just do it! Stop listening to that inner critic and just play!!

First up, I decided to use the journal that I experiment in.  It's nothing special, the paper's not great quality but I use it to stamp off after using a stencil.  So it contains all these pages with different splodges of colour.  It was perfect for this experimental play. 
The hardest part about starting a face is just that.....starting! Having colour already randomly splodged on the page made it feel safe.  It wasn't too clean and stark.


Something I did after my first one, was google Dina Wakley faces and I watched a 5 minute video which gave me a few tips and tricks.  I would recommend this.  It helped me with proportions.

But then that was it!! I stopped watching.
I started playing.
This can be a real trap for myself, watching you tube video after you tube video. There's so many inspirational people out there HOWEVER I find this robs me of my creative time, and I end up feeling too overwhelmed and too much pressure.

So my advice would be just watch 1 or 2 max and then go PLAY. 
You might just surprise yourself. 
I did.


 So once I got to this point I was busting to do more! 

So time to get the Dylusions Journal out. 
Eeeeek!!
I haven't ventured into the world of art journaling yet......I'm such a layout girl. But it's all about being BRAVE remember!


 I used Scribble Sticks for the background and the face.


I added a few stamps from AALL & CREATE and a touch of journaling.


A few word stickers from 7Dots and I was finished!


There you have it.

I hope this inspires you to step out of your comfort zone and give something new a go. Perhaps something you've always wanted to do........ ignore that inner critic......enjoy the process.


Scrap Matrix Products used:

Friday 2 March 2018

Another Ranger creation for Scrap Matrix

Today I'm sharing another creation using Ranger products available from Scrap Matrix.

So many products, so much inspiration.

Today I'm sharing another layout created using Ranger Scribble Sticks and other Ranger products. Can you tell I'm a Dina Wakley fan??


Last time I used a dark background, so I thought this time I'd go with a white background.

 
This layout documents my One Little Word for 2018.
 
I always choose one to give me a focus and as a guide throughout the year.
 
This year I chose CHOOSE. Lol.  For a number of different reasons.
 
 
I began by applying clear gesso to my background.

I then applied some Scribble Sticks using water and a brush.  I love the effect of this.  It's like watercolour, but the colours are stronger, which suits me to a T.....I'm sure by now you all know I'm a big COLOUR fan.

 
I then added lots of stamping. 
 I used Dina Wakley Stamps and some stamps from 7Dots Studio for this.
 
 
This is how my background looks.
 
 
I love those Ranger Dina Wakley Just what to Say stamps with the sentiments on them. 
 I've used them before for cards, and they are so perfect on this layout.


I then applied some more Scribble Sticks with water to white cardstock. 
Once dry I stamped some Ranger Dina Wakley Scribbly Flower stamps with Archival Ink and cut them out.
 
These will be perfect for some clustering on my layout.

 
I then added some layers behind my photo.
I used 7Dots Studio tags, and some leftover Pinkfresh.

 
I coloured some White Mini Flowers using Scribble Sticks and water.

 
I then layered it all together.
 
I used foam tape to hold up all the layers, so I can tuck more between the layers.
 
 
I tucked some leaves that came from the Heidi Swapp 6x6 Mixed Media Paper Pack amongst the layers.
 
I also used Heidi Swapp epoxy stickers - Friends for my title. I used the 'Hello'.
 
 
I added journaling, some pink twine and a metal flower which I painted with black gesso.


So that's it from me today!

If you haven't got your hands on Scribble Sticks yet, I urge you to do so, they are SO fun and so versatile!!


I'll leave you with a few close ups......


I'm loving the entries coming in so far.  There's heaps of time to get yours in.  Just head to the facebook Scrap Matrix shares group, and pop them in the Ranger album.  Don't forget to let us know in the comments which Scrap Matrix Ranger products you used.


Marshmallow Cardstock
Liquitex Clear Gesso
Ranger Dina Wakley stamps - Just what to say
Ranger Dina Wakley stamps - Scribbly Flowers
Pink Twine